On our support site we provide a manual on how to use the features in Blue Billywig’s Interactive Video Studio. This manual is a good reference guide when you are creating interactive videos and want to find out how to use each element in the module. Though how do you use our Timeline module in an efficient way in larger projects or when you work with it on a regular basis? In this post I would like to share some tips on how you can do this.
1. Use Apps for recurring interactivity in multiple videos
Recently, in larger projects where the same interactive elements occur in multiple clips, we noticed that there was not a proper way to reuse the interactivity from a particular timeline. For example, how would you reuse a pop-up information panel created in one video’s timeline? One approach would be to import the timeline in which the pop-up panel was created and remove all unneeded widgets, but this could be a problem if you decide to change the pop-up panel later on: you will need to make the change in every timeline where the pop-up panel was imported.
The solution for this are Apps. An App is a clipless and timeless timeline where you can add the interactivity you need and select what you want to have customizable in each video. Simply add the App widget in each timeline where you need it and select the correct App. To come back to the pop-up info panel example, this means that you can put all the widgets and their interactivity in the App and select the option to allow changes to the widget that you want to customize for each video. This way, you can change the part of the info panel in the videos where the info panel needs to show different information. If you want to change something in the interactivity or appearance of the pop-up panel, you now have a central point where you can make these changes apply immediately to all timelines where the App is used.
In addition, this allows you to have multiple forms in your timeline – one created in the respective timeline and others created in Apps.
2. Copying widgets in a timeline
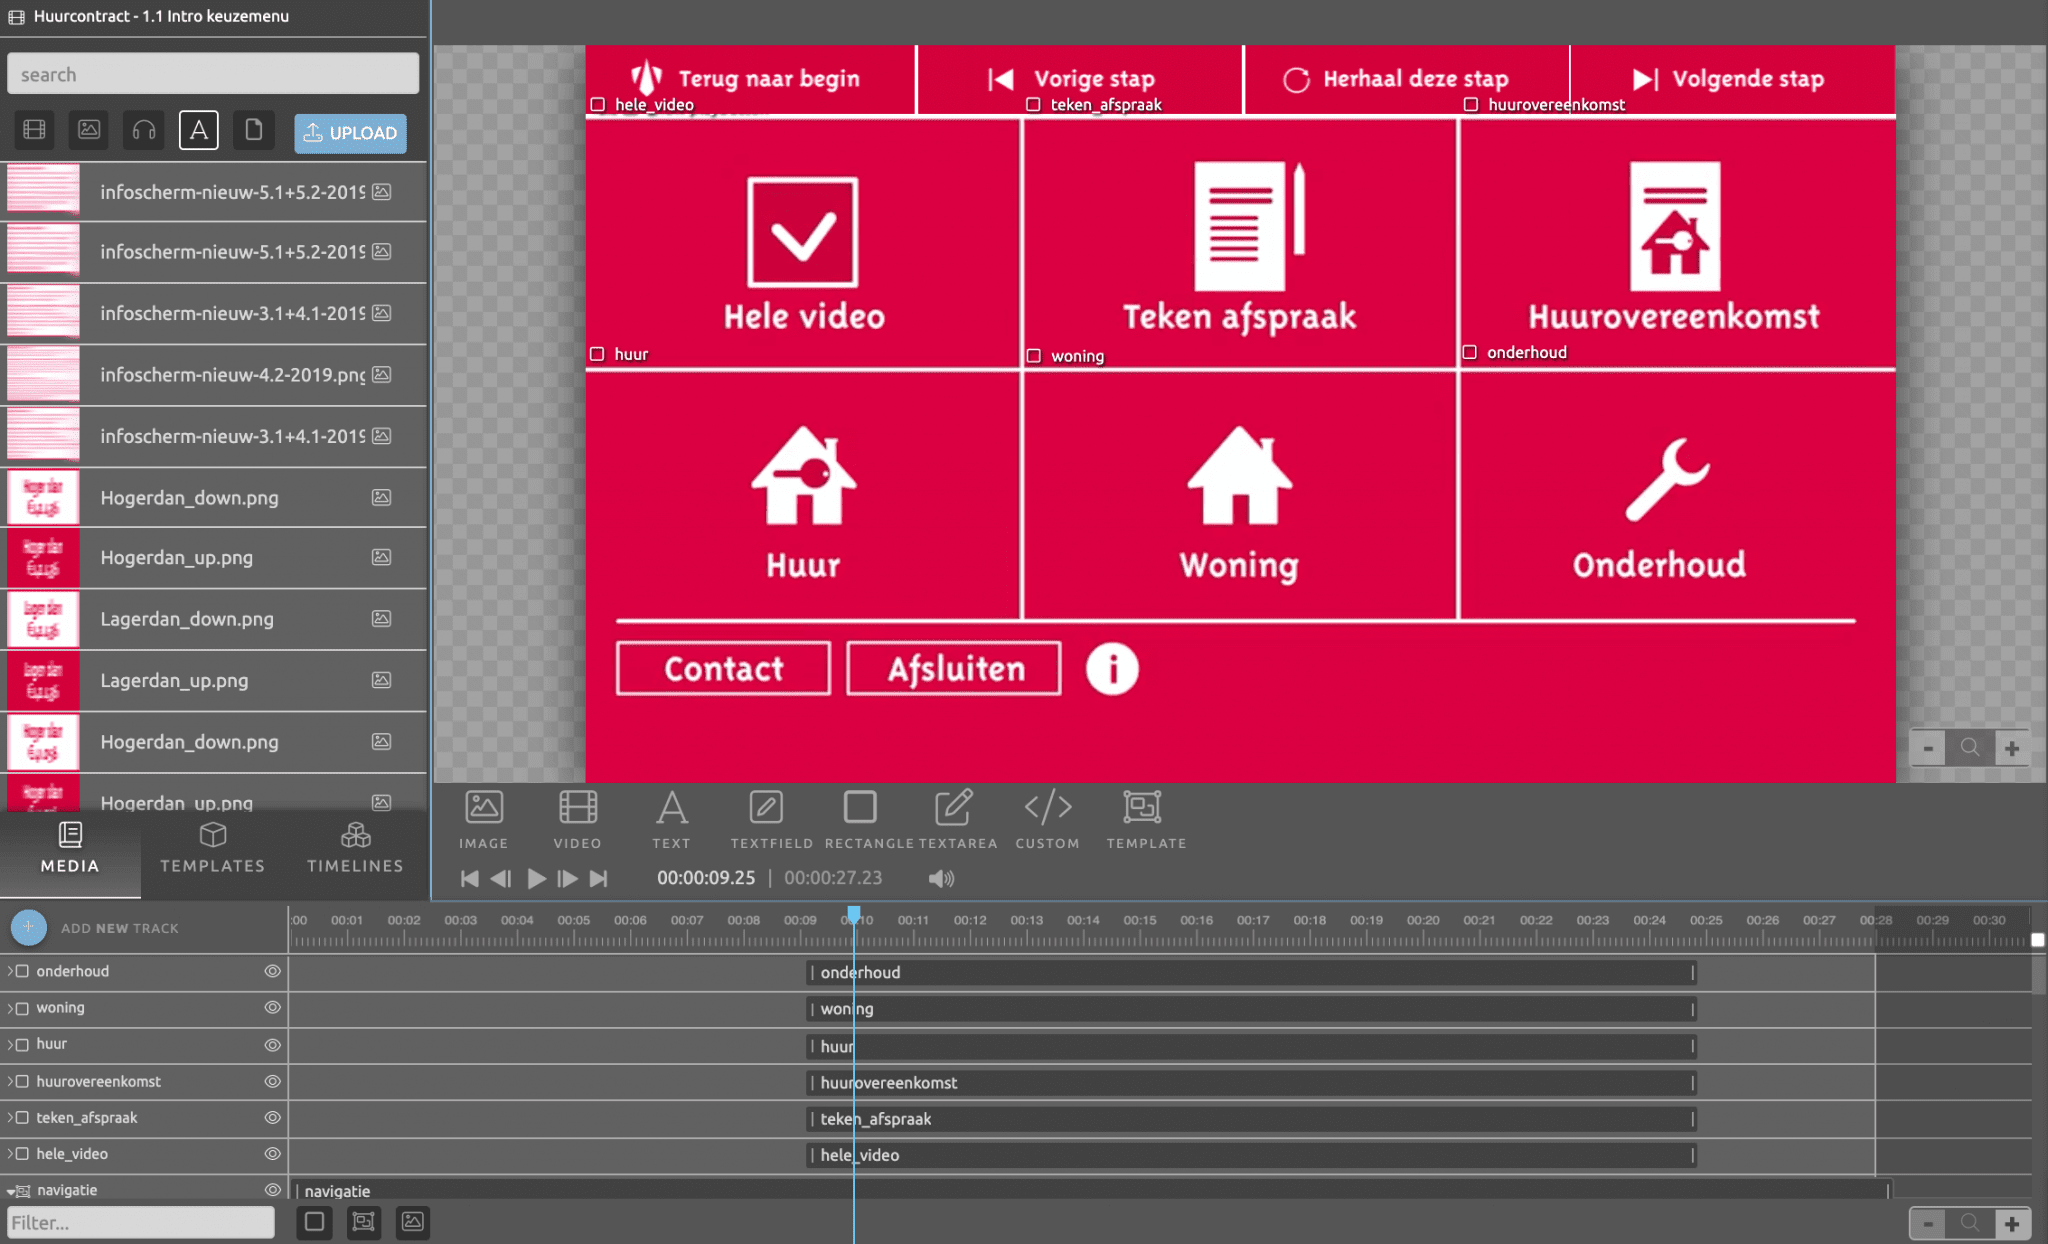
It often happens that you need to have more widgets with the same size and / or with the same configurations. This is often the case when you use rectangles as mouseovers to make buttons light up or if you want to have two images of the same size. Being able to copy a widget with its functionality instead of adding and configuring a new widget for every rectangle saves me a lot of time. To copy a widget, press the Alt key and click on the widget in the canvas. The widget will now appear right on top of the one you copied and its name will have the suffix ‘_duplicate’.
3. Give widgets meaningful names
It might be an obvious point, but I cannot stress enough the importance of giving your widgets meaningful names. This will make it easier to find widgets in all widget dropdown lists. For example, renaming a copied widget from ‘menuButton_duplicate’ to ‘infoButton’. If your widgets are easy to find, makes it easier and faster to use the Timeline module, particularly if there are multiple people working on it.
4. Quickly build an interactive interface
If you are short for time and quickly need to add interactivity to a clip, there is a way to quickly build an interactive interface. During the design stage you will have an idea where you want to place your interactive elements. The design would probably have images you want to use as buttons, which you would need to upload in the Video Management System first before you can use them. Then you would add each widget individually to the timeline and move them to the correct coordinate on the stage. To save you from doing all this, you could add the images to a single image which you only have to upload once. You can then add the interactivity by using a rectangle as an overlay to click on, or using it semi-transparently as a mouseover. If you do not need to change the size of your elements, or need to attach a different mouseover image to one of them, placing multiple elements in one image is a quick way to build an interface in a clip.
5. Simultaneously apply size and position changes to multiple widgets
Similar to copying widgets, another trick that will make your timeline work more efficient is the ability to change multiple widgets simultaneously. For example, if you have a set of widgets (e.g. a menu) and you decide later on that this menu needs to be larger. Instead of changing the size of each widget individually, you can do this in one go by selecting all the widgets you need to change and dragging on the green corner of one of them. You select the widgets through pressing the Shift key and clicking on the widgets you want to select on the timeline.
6. Time based and condition based interaction
Not all widgets on the timeline are necessarily time based. You can use actions and conditions on widgets to enhance the structure of the interface you are building. For example, you could show parts of a menu after a click or show a message if a form field is not filled in. This means that the widgets that appear after such an action or condition should have their behavior set to ignore timeline show and ignore timeline hide, because otherwise they would appear at the time point you placed them on the timeline. These “hidden” widgets (the ones with jagged edges) can therefore be placed anywhere on the timeline.
This is particularly useful when a clip contains so many interactive elements, that it’s difficult to determine which widgets you have on the timeline. When this happens, it’s good to cluster related widgets together. Once you’re happy with the layout, make the blue bars of the hidden widgets the same length and place them underneath each other.
7. Batch actions
If you use multiple actions which you need to call several times on the timeline, there’s a way to avoid replication by grouping these actions. This is done through attaching the actions to a rectangle widget, which you use as a controller. Then, you can call the rectangle controller anytime you need the group of actions. You would use this, for example, if you build an image carousel.
Creating interactive videos in the Studio
We will continue to improve our Interactive Video Studio to make creating interactive videos an even more efficient and enjoyable experience. Make sure you use the App feature when you’re working with recurring interactivity.
Hopefully these tips are useful to you and for a more in-depth look on how to use each element in the Interactive Video Studio, please find the manual here.