How to Make an Interactive Video: Enhancing User Engagement
Interactive video transforms viewers from spectators into active participants, so it’s no surprise that they deliver up to four times the viewer engagement (and boost clickthrough rates by 10x) (Source: i4v).
The production process for an interactive video differs quite a bit from the process for a linear video, so it’s time to demystify the process. In this blog, we’ll show you how to produce an unforgettable interactive video in 6 simple steps.
What is interactive video, exactly?
Before we dive into the process of creating an interactive video, let’s first understand what it is. An interactive video is a multimedia experience that allows viewers to actively engage with the content. It enables users to make choices, click on hotspots, or participate in quizzes, transforming the viewing experience from passive to active.
Interactivity is typically added in one of two ways:
- Branching
- Overlays
With branching, your viewers can take different paths through the video, like giving the user choices that the video adapts to. Overlays allow you to layer interactive elements, like clickable buttons, over the video. The possibilities are nearly endless, but here’s how you can get started with making your linear videos interactive.
Interactive videos are a powerful tool to engage and captivate your audience. By combining visual elements with interactive elements, you can create a memorable and immersive experience that keeps viewers hooked. Let’s explore the steps to make an interactive video that leaves a lasting impact on your audience.
Interactive video production in 6 steps:
Step 1: Setting goals
Every successful video begins with a clear objective in mind. Determine the purpose of your interactive video. Are you aiming to educate your audience, drive sales, or boost brand awareness? Understanding your objective will help you tailor the video content and interactive elements accordingly, resulting in an effective and engaging video. Your goals should be supported by good key performance indicators (KPIs) that measure relevant data.
Goals and KPIs aren’t the same thing–A goal is what you want to achieve, and KPIs are how you measure it.
Examples of KPIs and goals
Is your goal to increase brand awareness? In that case, your KPIs could be new website visitors, views on your video, and number of social media followers. KPIs aren’t goals in themselves, but a good way to check how your project is doing.
Step 2: Flowchart
Next, determine the format and style of your interactive video. Will it be a tutorial, a quiz, a choose-your-own-adventure story, or something else? The format and style should align with your goal and target audience.
A flowchart is a visual representation of the steps and decisions in a process. It’s a useful tool for planning and organizing an interactive video, as it provides a clear and concise overview of the different elements and how they fit together.
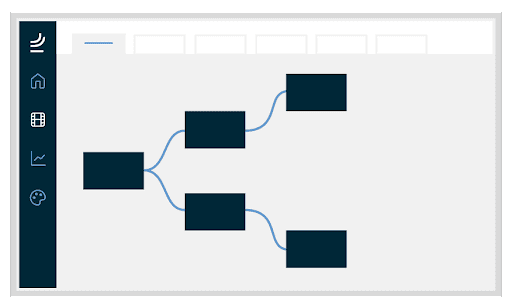
The steps to create a flowchart
Start by identifying the main goal or objective of your interactive video. This will be the starting point for your flowchart.
Next, list the key steps or scenes in your video. These might include introductions, explanations, challenges, quizzes, or other interactive elements. For each step, identify any decisions or choices that the viewer can make. For example, in a quiz, the viewer might have multiple answers to choose from.
As you create the flowchart, test and refine it to make sure that it accurately represents the structure and flow of your interactive video. Once your flowchart is complete, use it as a reference and guide during the production process to ensure that your video is well-organized and engaging for your audience.
Step 3: Interactive script
Scripts provide the dialogue, actions, and other details that will be included in the final project. When creating a script for an interactive video, you should consider the different choices and paths that the viewer can take, and how the script will need to accommodate these variations.
Key elements for an interactive script
1. Text
Who says what, and when? In addition to “regular” text in your shots, it’s important to give viewers time to read and interact with buttons and other elements.
2. Choices
Choices are the different options or paths that the viewer can choose from in the scene. This might include different dialogue or actions for each choice.
3. Transitions
The way that the scene will move from one choice to the next. Examples of transitions are fades, cuts, or other visual effects to indicate the change in the story.
4. Interactive elements
The success of an interactive video heavily relies on well-thought-out interactive elements. These elements can include clickable buttons, polls, quizzes, and branching scenarios. Strategically place these elements throughout the video to maintain viewer interest and interaction.
Where are buttons positioned, and should they link to other clips or external sources? Considering this in the script ensures that there will be space in the frame to add the buttons later and for actors to be able to do things like point to a button, for example.
Step 4: Interactive storyboard
Crafting a compelling script and storyboard is a vital step in ensuring a seamless flow for your interactive video. The interactive storyboard serves as a visual representation of your video, outlining key points, transitions, and interactive segments. By keeping the content concise and engaging, you can effectively hook viewers from start to finish.
Once the interactive script is ready, the production company transforms it into a storyboard. This storyboard includes drawings of all the shots envisioned for the video. These illustrations facilitate interactive thinking, allowing you to consider all the elements, from actors to clickable buttons, during the filming process.
For instance, if you want the person on screen to point at a clickable button in the video, planning ahead is crucial. By drawing the placement of the button in the storyboard, you can strategically incorporate it into the filming process. This proactive approach ensures a seamless and engaging interactive experience for your viewers.
Step 5: Lights, camera, action!
Shooting an interactive video involves the same general process as shooting any other type of video, with some additional considerations for the interactive elements. Start filming by following the plan from your script or storyboard. Be sure to capture all of the necessary footage for each scene, including the dialogue, actions, and interactive elements.
As you shoot, be prepared to adapt to any changes or challenges that arise. If a scene doesn’t work as planned, you may need to reshoot it or adjust the plan. Going for an animated video gives you a little more flexibility and room to add additional frames later, but follows the same steps as a live-action interactive video.
Step 6: Adding interactivity
It’s a wrap–You have all your footage. Now, the editor will add the interactive elements. Many online video platforms allow you to add these elements yourself, but sometimes it makes more sense to have an Interactive Producer assist with this. Especially if you have an extensive interactive project with many interactive elements, branching, or custom interactivity.
It’s key to test your video before you publish your video, so that you can be confident about the final product. Make sure to test if each interactive element works properly and have a colleague (or two), who wasn’t involved in the production of the video, check it for you. That way you have a fresh pair of eyes to check for things you might’ve overlooked.
Launching your interactive video
Before releasing your interactive video to the public, thoroughly test all interactive elements and functionalities. Ensure that the video runs smoothly and all interactive elements are responsive. Additionally, collect feedback from a small group of users to make necessary improvements.
Promote your video through various channels like social media, email newsletters, and your website. Encourage viewers to interact and share their experiences to create a buzz around your content.
By effectively launching and promoting your interactive video, you can successfully reach and engage your target audience, making a significant impact with your content.
Analyzing, tracking and monitoring
Monitor the performance of your video, using analytics tools or other metrics to track viewership, engagement, and your other KPIs. The feedback and data from your video are very valuable information that can help you refine and improve your video, as well as your overall interactive video strategy.
Are you ready to create interactive video content?
Interactive videos offer a fresh and captivating way to connect with your audience. By following the steps outlined in this guide, you can craft an immersive and interactive video that deeply resonates with your viewers, encouraging active participation, and successfully achieving your desired objectives. Embrace the power of interactive videos, and witness your user engagement soar to unprecedented heights!
In the realm of interactive content, the saying “seeing is believing” holds true. That’s why we have compiled a list of 10 interactive video examples, to inspire your next project.
Are you eager to explore the endless possibilities of interactive video content? Reach out to us at hello@bluebillywig.com, and our team of video experts will gladly assist you in getting started on your interactive video journey!

Want to learn more? Explore our other updates


Find out how our platform can support your video strategy
Fill out the form and one of our video experts will happily show you around our platform and answer any questions you might have.